
Braised Pearl Onions
- Matthew C. Walker

- Jun 26, 2025
- 7 min read
Updated: Jan 16

Braised pearl onions are an absolutely delicious side dish that is so simple to make it is ridiculous. There are very few ingredients, and none of the skills and techniques needed are complicated. This is a classic holiday side dish that really encompasses the concept of an ‘umami bomb’ because of the savory explosion of flavor and how the sauce coats your palate. This side dish fits in nicely for Thanksgiving, Christmas, New Years or any comfort food or gathering meal when the weather starts getting colder. Here in New England that is really anytime from the first crisp chills of Fall until the Spring thaw.
Plus these onions can be as complicated or as simple as you want to make them. There is nothing stopping you from blanching and peeling an entire bag of onions and using some homemade stock to simmer and finish with fresh chopped herbs. On the other hand, you can also use frozen onions, broth or stock from a can, and shake some dried seasoning on top at the end. In both cases, the results will be great. This recipe allows cooks of all skill levels to create a delicious dish that showcases its beauty with its simplicity. It isn’t complicated, and there are not a lot of ingredients. The most advanced part of this is that you need a cooking container with a lid.
Nutritional Information
The provided nutritional information has been compiled from various online sources and should be regarded as an estimate. Actual nutritional values may vary based on factors such as specific ingredients used, variations in portion sizes, and individual preparation methods. It is advisable to consider these numbers as general guidelines rather than precise measurements. For accurate nutritional information, it is recommended to consult with a registered dietitian or utilize specialized nutritional analysis tools based on the exact ingredients and quantities used in your preparation.
These Braised Pearl Onions could also be made vegetarian style if you substituted vegetable broth and a different fat than butter. Also depending on where you are sourcing your definition of ‘braised’ versus ‘stewed’, it may be more accurate to refer to these onions as ‘Stewed Pearl Onions’ instead. Either way, you will be browning onions in a pan with fat, covering with liquid and simmer covered before taking the lid off and cooking the liquid down to a thick velvety sauce. Whether that makes it stewed or braised, it is what we will be doing.
Serving Size: 1/3 of dish
Calories: 108
Protein: 3 g
Fat: 4 g
Net Carbohydrates: 10 g
Ingredients-
Pearl Onions (frozen, 1 lb) (You could also substitute fresh and adjust cooking times, cook until the onions are soft all of the way through, they shouldn’t ‘crunch’ when you bite into them)
Stock (2 cups)
Butter 1 Tbl
Oil (enough to coat the pan)
Salt
Pepper
Parsley
Equipment-
Microwave safe container
Saute Pan with a Lid (the kind with higher straight sides and a fitting lid as opposed to a ‘frying’ pan, but if you don’t have one of these, the important part is that it has a lid and can hold the liquid. Enameled Dutch Ovens also make ok substitutes here)
Stirring implement
Instructions- Braised Pearl Onions
1. Prepare the Onions:
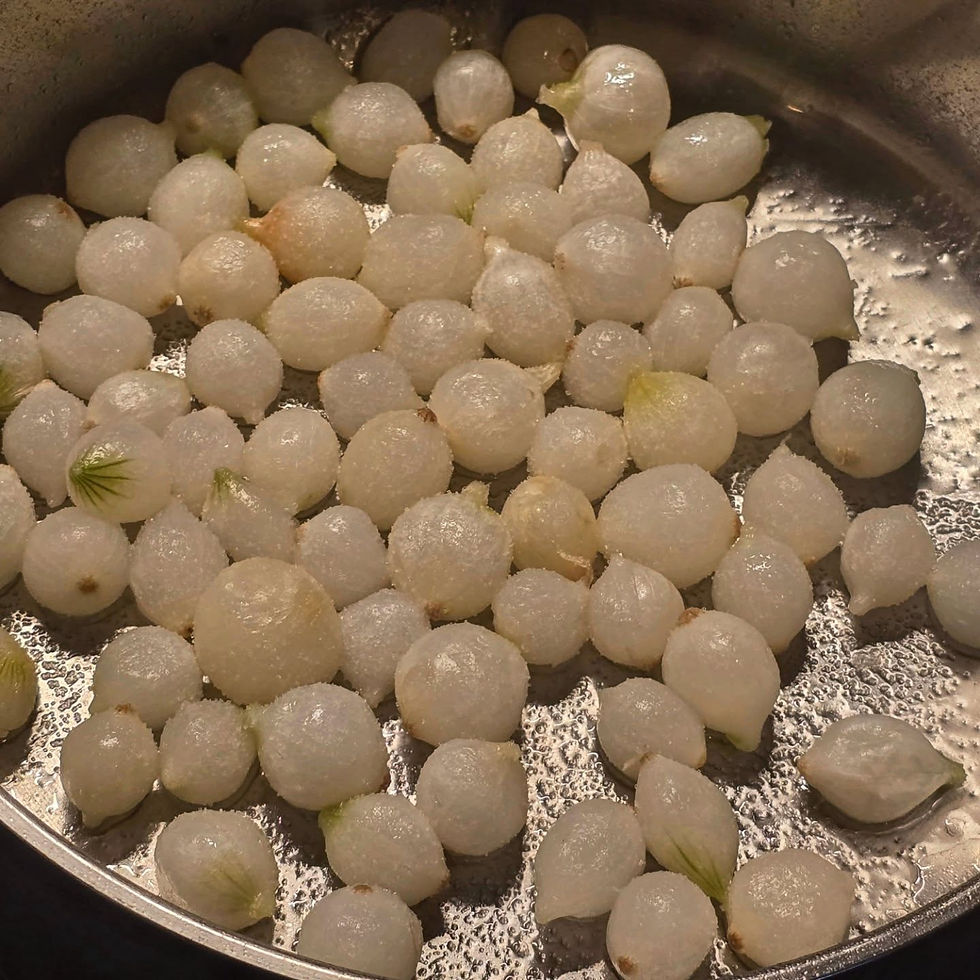
Frozen Onions: The easiest way to make this dish is with frozen, peeled pearl onions. They can often be steamed right in the bag and you can just buy 1lb of onions and have exactly enough for the recipe without worrying how many onions you will actually have after peeling. If you are using the frozen onion method, you can cook them in the microwave according to the instructions on the bag which usually involve either steaming them directly in the bag, or adding to a microwave safe container with a couple tablespoons of water and cooking for several minutes. It isn’t vital that the onions get completely cooked all the way through at this stage, just that they are no longer frozen so we can finish cooking them in the saute pan.
Fresh Onions: The blanching method will require starting an additional pot of water to boil and a dedicated ice bath. The onions will be ‘blanched’ by placing them in the boiling water for a short amount of time and then moving to the ice water to ‘shock’ them and stop the cooking process. Then the onions individually will need to have the outside layer of skin peeled off of them. Using fresh onions may require some additional simmering time in the liquid in order to make sure they become soft all of the way through.
I will be honest, I have eaten the braised pearl onions a ton of different ways and by the time they are served, I really cannot tell the difference between fresh onions and frozen onions. It is also less labor intensive to just use frozen, but you can do either and it will still be beautiful and delicious.
2. Browning the Onions:
Regardless of which method of onions you are using, the next step is to brown the onions in the saute pan. Preheat the saute pan over medium heat and add your cooking fat. I enjoy a nice olive oil, but as long as it is a fat that will brown the onions, what you choose is up to you.
Once the pan and the oil are up to temperature, add the onions. The pan should be hot enough to make that sizzling sound when the onions are added, but not hot enough that they begin smoking and turning black. Now is also a good time to add some salt to the onions, just a little sprinkle over the top to help season them and get them to start expressing the moisture trapped inside of them.
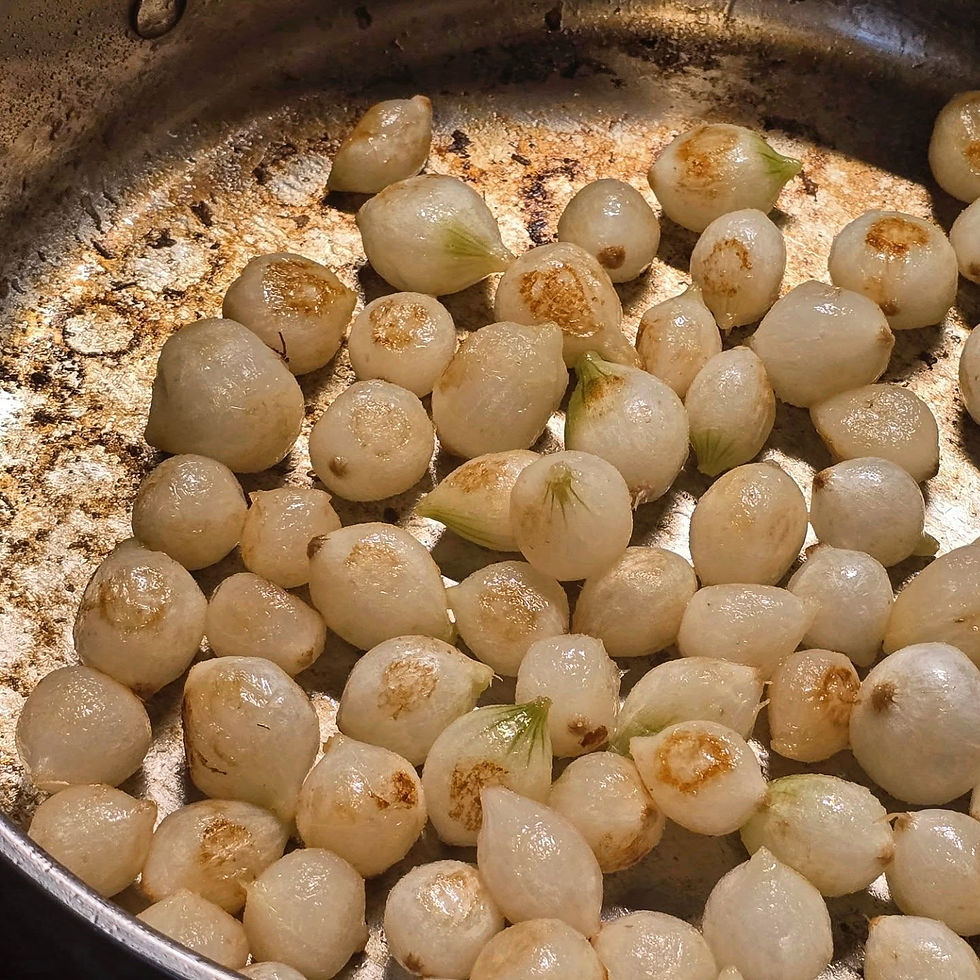
It will take a couple of minutes of cooking and shaking the pan to roll the onions around. You want the skin of the onion to start turning brown like it is a steak developing a sear. The bottom of the saute pan should also be browning and collecting little bits and pieces of onion and developing a fond that will be deglazed shortly.
You want the fond to be a brown color, if it becomes black it will smell and taste burnt and that is not the flavors that we want to impart into the sauce. Right now we are just frying the onions for color and texture on the outside. You do not have to worry about cooking them ‘all of the way through’ just yet, because they will continue cooking after we add the liquid.
3. Adding the Liquid:

When the onions and the fond are brown all around it is time to add the liquid. A good ratio is up to two cups of broth or stock to one pound of pearl onions. I find it really needs at least a cup and half. After it cooks down we will be left with closer to one quarter to on third of a cup of liquid.
How much salt you need to add will depend on how much salt is in your broth. A low sodium canned broth might need some, but a full salt homemade broth may not. You can also omit extra salt for health reasons too, this seasoning is entirely your preference.
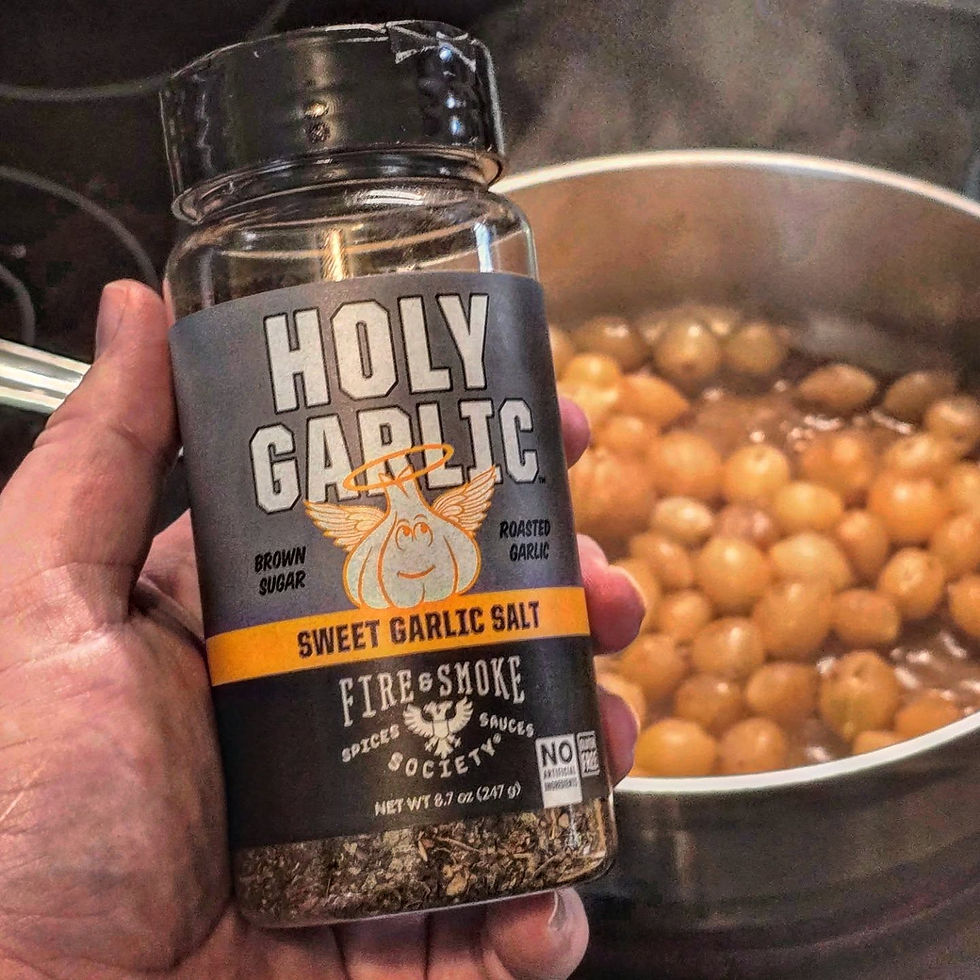
The type of liquid you use is also a matter of preference. I have made these onions with both beef and chicken stock and both are great (kinda like braise and stew, we are using stock and broth interchangeably because the idea is that it is just your flavored liquid of choice). Bone broth, mushroom stock, or any other liquid that you would make a soup or a sauce out of will probably work here.
Add the liquid to the pan, and stir in order to bring up all those little bits of fond off of the bottom of the pan. Allow the liquid to come up to a simmer and place the cover on the pan, reduce the heat to keep it at a simmer and not rise to a boil. Let the onions cook like this for at least 15 minutes or so. This is the braising/stewing portion. Depending on the size of your pan, how much liquid you have, and the size of your onions you may have them completely covered in liquid. That will make them more stewed onions while if we were partially covering them and cooking them in the oven they may be more braised onions.
Either way, it is this simmering in the liquid that will do most of the cooking to make the onions soft all of the way through.
4. Finishing:
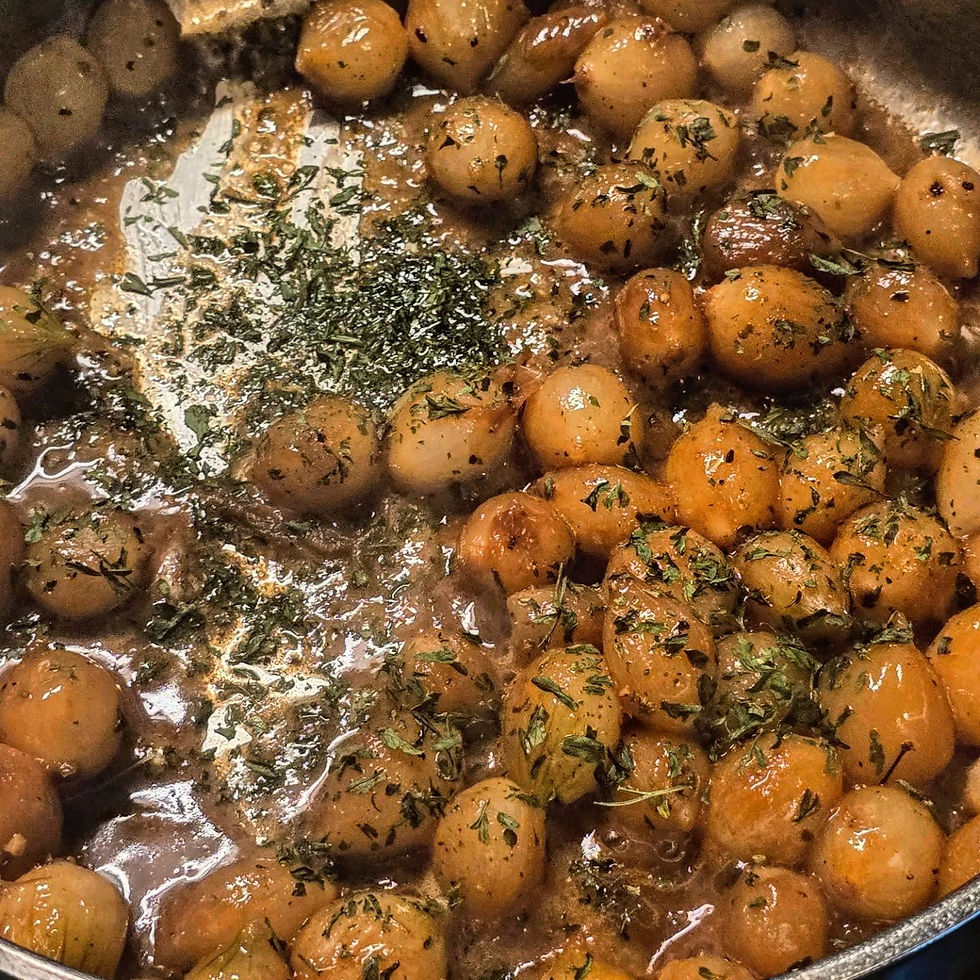
After they have simmered with the cover on for 15-20 minutes it is time to remove the lid and allow the moisture to start evaporating. This will take another 15-20 minutes or perhaps even a bit longer. What we are doing at this stage is cooking the extra moisture away and we want that two cups of stock to reduce to a half cup or less of super concentrated flavorful sauce that has thickened enough that it coats the onions.
If you are using a homemade stock that has natural gelatin in it, you can see when it starts to happen. The liquid in the pan will start bubbling and the onions will look like they are in a bubble bath. When this starts to happen, you are almost done, but continue cooking for a few minutes. Stir occasionally to prevent the onions from burning where they are making contact with the pan.
As the sauce begins to thicken and you are left with a half of a cup or less of liquid, add a tablespoon of butter and a final dusting of salt and pepper, or whichever seasonings that you prefer. Mix everything thoroughly to get the butter incorporated into the sauce which should at this point be thick enough to coat the back of a spoon. If it is still runny, it might need to cook down further unless you used a broth with no fats or collagen in which case just a sprinkle of xanthan gum can be used to bring it all together.
If I have chopped fresh herbs, I don’t add them in the pan. I transfer the onions and the sauce to a different bowl and mix the diced herbs in. If I am using jarred seasonings like dried parsley or chives, I don’t know as if it matters as much. I do feel like the bright green flecks of seasoning really make the dish pop visually so to me, it wouldn’t be the same without some parsley in there.
Then that is it. Serve these as a side to that Thanksgiving Turkey, Christmas Ham, or whatever those Fall/Winter comfort meals are. These braised pearl onions are simple, and just as good with frozen ingredients as they are fresh which will save you the hassle of peeling a pound or more of pearl onions. For another late Autumn side dish that compliments these onions and still pairs well with allof those comfort meals, check out Air Fryer Roasted Beets with Lemon & Thyme.


Comments